
As an Amazon Associate I earn from qualifying purchases and sometimes recommend products from other sellers at no extra cost to you. For more details see my disclosure policy and privacy policy.
This post may contain affiliate links - I may make commission from any purchases.
You have finally set up your craft space. The shelves are labelled, the bins are sorted, and everything has a home. Give it three months and see what happens.
Most craft room advice stops at the pretty part: layout, colour schemes, storage bins that match. What it skips is the bit that actually keeps a space usable, which is upkeep. A functional craft room isn’t the one that looked best on the day you finished setting it up. It’s the one that still works six months later, when the glue gun has gunk on the nozzle and the Cricut mat has lost its stick.
This guide pairs the setup side of craft space organisation with the maintenance side, so your new space stays functional instead of sliding back into clutter. We’ll cover zoning your space around how you actually work, cleaning the equipment that gets the most use (Cricut machines included, but not exclusively), and building a simple routine so upkeep never means relearning the whole space from scratch.
Table of Contents
Start With Zones, Not Just Storage
Before you buy another storage bin, think about how you actually move through a project. Craft room organisation usually gets framed as a storage problem: where do the ribbons go, where do the beads go. But a functional space is built around workflow first, storage second.
Try dividing your space into three basic zones:
- A cutting or machine zone. This is wherever your Cricut, sewing machine, or other primary tool lives. It needs power access, a clear surface in front of it, and enough room that you’re not reaching over cables to grab a mat.
- A work surface. Somewhere separate from the machine zone where you assemble, glue, or finish a project. If your machine zone and your work surface are the same six inches of desk, you’ll be shuffling supplies constantly.
- Storage, sorted by how often you reach for it. Daily tools stay within arm’s reach. Occasional supplies go on a shelf. Rarely used items can live in a cupboard or under a table.
This isn’t about making the room look a certain way. It’s about reducing the number of steps between “I have an idea” and “I’m working on it,” which is the same principle commercial kitchens use when they place the stove, the sink, and the prep counter within a short walking triangle of each other.
Cleaning Your Cutting Mat and Machine
If you use a Cricut or a similar cutting machine, the mat is usually the first thing to lose its usefulness. It picks up lint, glitter, and paper dust every time you cut, and once it stops gripping properly your cuts start shifting mid-project.
The simplest fix is one we’ve covered in detail before: cleaning your Cricut mat with baby wipes. Use an alcohol-free, fragrance-free wipe and go over the mat in small circular motions with light pressure. Alcohol and lotion-based wipes will break down the adhesive layer faster, so plain, gentle wipes are worth keeping on hand specifically for this job rather than grabbing whatever’s in the bathroom cabinet.
For stubborn lint left behind after cutting something like glitter vinyl or fabric, tweezers will lift the visible bits, and a strip of painter’s tape or transfer tape pressed lightly onto the mat picks up the rest. Let the mat air dry fully rather than towel drying it, since a towel just adds more lint back onto the surface you were trying to clean.
The machine itself needs less frequent attention but shouldn’t be ignored. Unplug it first. Wipe the exterior with a barely damp cloth or a baby wipe, and use canned air or a small brush to clear dust from around the rollers and blade housing. A cotton swab with a little rubbing alcohol handles any sticky residue on the blade area. Most manufacturers recommend this level of clean every three to six months depending on how often you’re cutting, and covering the machine when it’s not in use cuts down on how much dust it collects between cleans.
If you’re new to cutting machines generally, our introduction to Cricut machines is a good starting point before you get into maintenance habits.
Maintenance for the Rest of Your Kit
A Cricut is only one piece of equipment in most craft spaces, and it shouldn’t be the only thing getting regular attention. Whatever your primary tools are, they’ll have their own upkeep needs.
Sewing machines collect lint around the bobbin case and feed dogs faster than most people expect. A small, soft brush (the kind that often comes with the machine, or a clean makeup brush) sweeps this out easily. Avoid compressed air here specifically, since it tends to push lint further into the mechanism rather than clearing it out. Open the bobbin cover and brush out the lint after longer sewing sessions, and leave a full clean for a technician once a year.
Glue guns build up hardened residue on the nozzle surprisingly quickly. While the gun is still warm, wiping the tip with a dryer sheet or scraping gently with a ball of foil clears most of it. For a nozzle that’s properly clogged, soaking it in hot soapy water for around half an hour softens the buildup enough to pick out with a toothpick. Expelling a little extra glue before you put the gun away, rather than leaving a bead cooling in the nozzle, prevents a lot of this in the first place.
Blades and cutting tools dull faster when they’re tossed loose into a drawer. Rotary blades should go back under their guard the moment you’re done, and craft blades and replacement tips do best stored flat, in their original packaging or a small case, away from other metal tools that can nick the edge. Always cut on a proper mat rather than a bare surface, since that alone extends blade life significantly.
If needles, pins, or small blades tend to go missing between projects, a dedicated container like a magnetic needle case keeps sharp tools contained and visible instead of loose at the bottom of a drawer, which is as much a safety habit as an organisation one.
Build a Simple Recurring Maintenance Routine
None of this needs to become a big production. The point of a routine is that it’s small enough to actually stick to, so upkeep doesn’t turn into a project of its own.
A workable rhythm looks something like this:
- After each session: wipe down your work surface, cap the glue gun, and put blades back under their guards.
- Weekly: a quick wipe of your cutting mat, a brush-out of visible lint or dust around your main machine, and a scan for anything that’s ended up in the wrong zone.
- Monthly: a proper mat clean if it’s had heavy use, a deeper dust of machine interiors, and a check of blade sharpness so you catch dulling before it ruins a project.
- Every few months: the fuller machine service, whether that’s your Cricut’s rollers and blade housing or a proper sewing machine clean.
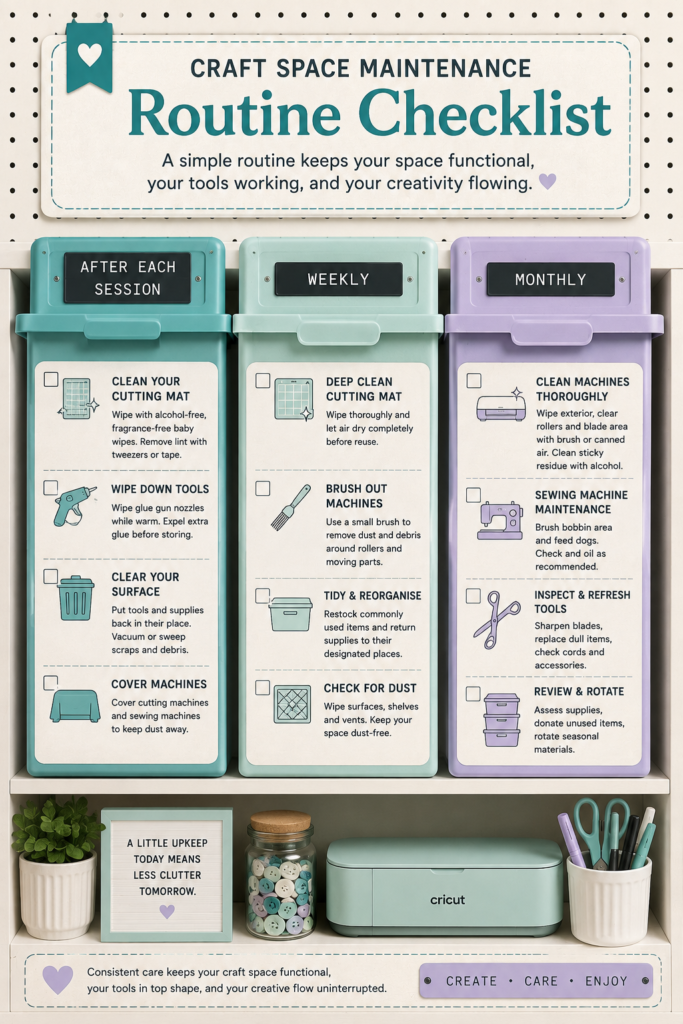
Keeping this routine visible, even as a simple checklist pinned near your workspace, means you don’t need to relearn what needs doing every time. It becomes muscle memory rather than a task you keep meaning to get to.
Storage That Doubles as Maintenance Access
The best storage in a functional craft space does two jobs at once: it keeps things tidy, and it keeps the tools you need for upkeep within easy reach.
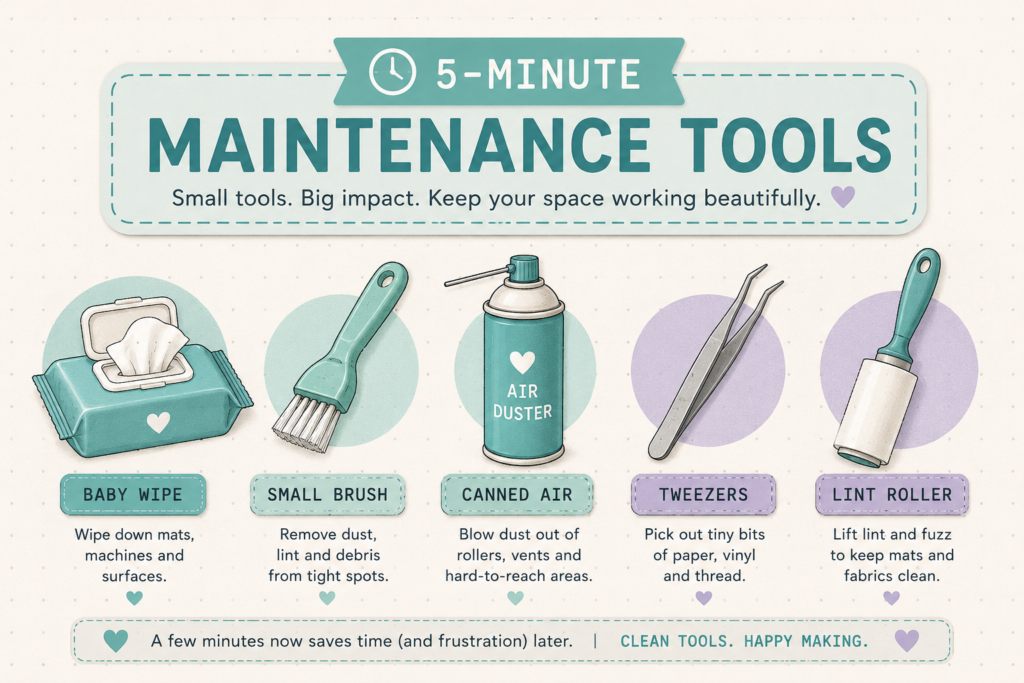
Keep your cleaning supplies (alcohol-free wipes, a small brush, canned air, a lint roller) in the same zone as the equipment they’re for, rather than in a general supply cupboard across the room. If the wipes live in the same drawer as your mats, cleaning them becomes a thirty-second habit instead of something you have to go and fetch supplies for.
For machines themselves, ventilated storage matters more than it gets credit for. A closed plastic bin traps dust and moisture against a machine’s casing, while an open shelf, a fabric cover, or a bin with mesh panels lets air circulate while still keeping dust off between uses. If you store supplies like embroidery floss or thread nearby, our guide on storing embroidery supplies has more on keeping smaller items sorted without losing track of them, and the same layered approach works well for knitting supplies, as covered in our knitting supply storage guide.
A functional craft space isn’t a finished project. It’s closer to a habit: zone it around how you work, give your equipment the small regular attention it needs, and keep the tools for that upkeep within reach rather than buried. Do that, and the space you set up this month is still the space that works for you next year.
